
Rails Engage: rails generate
24 Jan 2015
Rails comes with a lot of magic. When I was learning Ruby and Ruby on Rails, I was taught Ruby first, moved up slowly, and then was shown that all the things I did the hard way could be done by typing “rails generate” (or even just “rails g”!). I think the way I learned was good, but listen — we don’t have time for that right now, so we are just going to throw out this command and I will explain to you what it does. The deeper concepts can come later, but right now the most important thing is to get our hands dirty right away and generate a lot of code.
“rails generate” makes a lot of assumptions about what you might want in a robust web application and it generates things accordingly. There are more one-liners that can be used later to continue to expand your application as you need them.
The first command is rails new. rails tells your computer to use that code base and new is the command to generate a whole bunch of pre-written template code. You’ll need one more thing after that, and it’s your app name. So rails new marleigh will make all of those files generate in a folder called marleigh in whatever directory you are currently in. Make sure you know where you are in your terminal when you make this folder so you can find it again! If you aren’t sure where you are, you can type pwd. That stands for “print working directory.”
So rails new makes a lot of stuff. Do you need all of it? No. Shouldn’t you be writing beautiful, minimalist, clean code from the very beginning? No. You will have plenty of time to craft elegant code in the future, but right now let’s just get something running. It’s easy to get caught up the former and never get to the latter.
But what do we get?
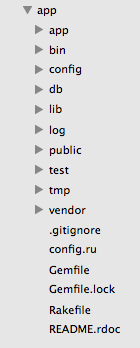
On the left is an image of what gets generated when you run that one line. That’s a lot of stuff! When I was cruising around on Github before learning anything about Rails, all of these files and folders scared the hell out of me. I also assumed they were all generated manually and that everyone knew everything about what all of these files and folders did and I had no idea where to look and I’d never get anything right and was just a big dum-dum. That’s wrong.
Here’s what’s right.
app – Most of your code will be written in this folder. It contains the models, controllers, and views, which are at the heart of the Rails framework. Another important folder within this one is the assets folder. There are other folders, too, but they are not required and you can ignore them for now. Just remember the MVC – we’ll go into that later when we start writing. The assets folder is for putting your custom CSS, JavaScript, and images.
bin – The code in this folder helps start up your app. If you have other things helping you out, they may needed to be booted up in here along with Rails. From the start, it’ll have what you need to get things running.
config – The config folder also gives you what you need to get off the ground, but very useful if you need to make modifications in the future, like because you are using a different server and need to change the database.yml file. There is one very important file in here, though, and it’s routes.rb. You will be using it even for a basic application.
db – Your database lives in this folder! seeds.rb is for populating seed data when you are testing.
lib – Other libraries go here.
log – Log files! You probably won’t need to look at these very much initially, but be glad they are there.
public – This is the only public part of your site. The rest of it is all hidden. Error pages, rules for robots like web scrapers, and your favicon (the tiny icon in the tab- section of your browser) live here by default.
test – An important component to writing code is writing tests to make sure that code works. I’m not gonna help you learn how to write tests, though.
tmp – Don’t worry about it. Just a spot for temporary files.
vendor – This is where you put code libraries from other places, like if you use Bootstrap or a JavaScript library. It’s the same as putting it in the Assets folder in /app but it’s polite to put code you didn’t write or generate into this folder. It also helps keep you organized.
config.ru – The ru stands for rackup. This configures the application for use with Rack-based servers. It’s set up as default.
Gemfile – If your app uses other gems (Ruby libraries) to accomplish tasks, the names of those gems should go here so that it can be easily loaded by anyone wanting to use the application. The Gemfile.lock file is created after it is “bundled.”
Rakefile – If you find yourself doing a task frequently and want to automate it, you can turn it into a rake task. If you have one of those, you can put it here so that it loads along with your application.
.gitignore – This is where you put files that you don’t want to upload to git. This is in all git repositories, but Rails auto-populates it with stuff you never need to load to a public git directory.
README – Documentation is important. This is a good place to put information about your app and how to use it.

It’s still a lot all at once, right? And how do those pieces even work together?! That’ll be what we go into next when we start writing code. A lot of this stuff is excessive for what you want to do, but it helps us get to the fun stuff right away.
The first link in the resources is great at explaining all of this in detail, so I recommend going over it (and over it and over it) to have a good understanding of how these parts work together.