
PBCore, Mediainfo, and FFmpeg step-by-step
04 Oct 2024Hi hello! It’s been a few months since I’ve updated this blog, but I’ve been busy. Right now, I’m busy teaching a 4-week workshop to students at the University of Illinois Urbana-Champaign all about a/v preservation tools. Part of their work requires them to group together and make descriptive metadata records for an “preservation-quality file” (in this case, we are using a clip from the ubiquitous Big Buck Bunny, though, to cut down on size constraints and processing time). They’ll make an “access copy” with FFmpeg, an extraction of the audio track with FFmpeg, and extract file metadata for all three files using MediaInfo. Then, they’ll use PBCore Cataloger to add the technical metadata as “instantiation records” for each of the video objects. They’ll also have to consider file-naming conventions and validation as part of this project.
I’m going to go step-by-step through all of this work here, because I just did this as a full demo for the class last week.
Before actually starting, we need a file to work with (this is a little bonus to the actual project demo).
I used FFmpeg on one of the higher-resolution copies of Big Buck Bunny to cut into a smaller clip, and the students will be provided with that. To do that, I did:
ffmpeg -i bbb.mov -t 15 -c copy -map 0 archival-file.mov
This cuts the first ten seconds without changing any of the video properties. See ffmprovisr: Excerpt from beginning for an explanation for what each of these do.
Using MediaInfo (mediainfo archival-file.mov), I can see that the file is now under 7MB and the same stats as defined on the BBB webpage: “All of the videos are encoded with x264 and contain both an AC-3 5.1 surround sound track as well as a normal mp3 stereo track.” Now everyone will have a small file that we can pretend is a high-quality preservation copy without breaking the bank (or our University-provided storage accounts).
Now I can start walking through the assignment. This starts with generating a descriptive metadata record. For class, we are using PBCore Cataloger, which is a GUI for working with the PBCore metadata standard. I’m usually keen to jump directly into the XML, but for folks that aren’t into that, this works as an interface with some helpful hints about the standard. And I needed helpful hints during the demo, from both the application and my students, because candidly it had been a while since I’d worked in PBCore and I’ve never used this application before!
In PBCore Cataloger, this is a “New Description Document” (or Ctrl-N, at least on my machine). Opening up this new document, there will be a few exclamation marks and fields that are required, so those have to be filled out. This is a good time to think about catalog records and what kind of identification system might be used, along with any standards are guidelines for Title and Description fields.
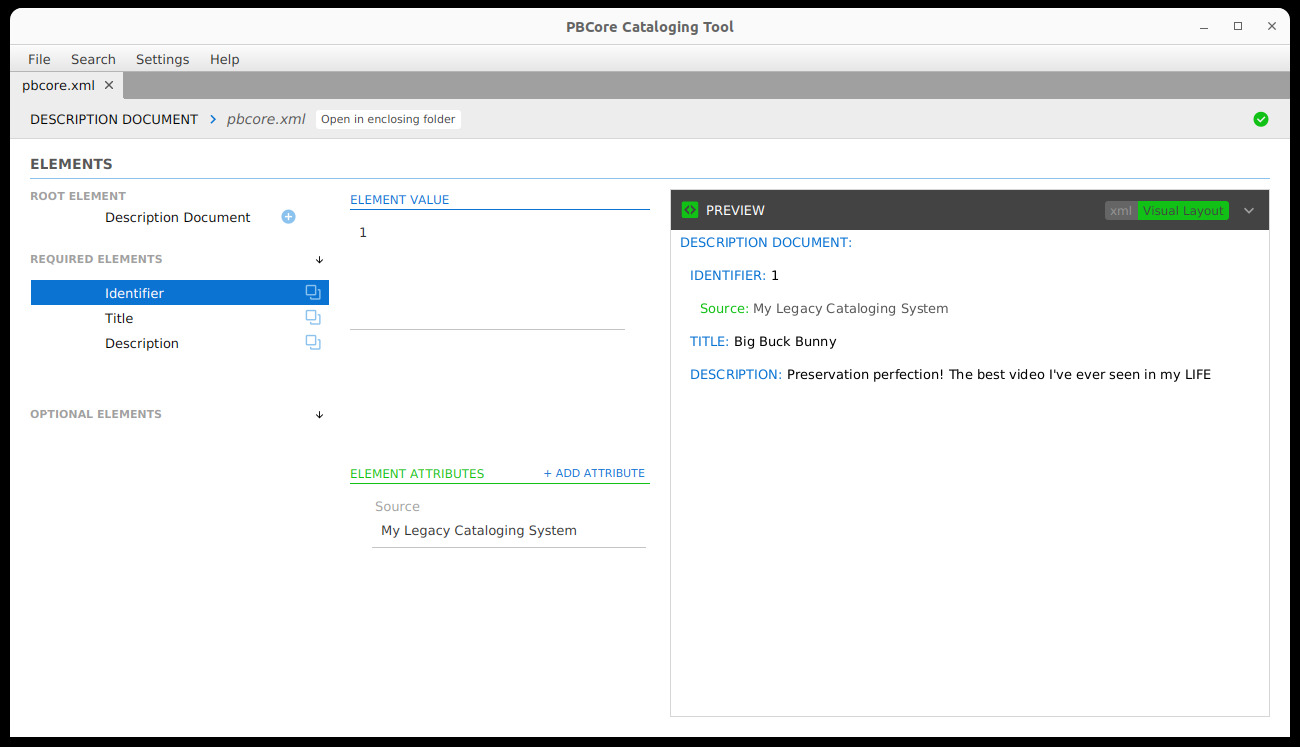
The document should have at least one identifier element and a value in that element and something in the Title and Description fields.
This gives us a minimum PBCore record that we can save using a specific naming system that we’ll adhere to for the rest of the example.
(There’s lessons to be covered here on metadata and cataloging fundamentals, and why we describe and store records, but that’s for other courses – this class just asks for the most basic “example” record)
Next, we put the record aside and get into the fun part – FFmpeg! We use FFmpeg for making an “access copy” of a file and extracting only the audio from the file.
Coming up with a plan for this class, and for all classes I’ve done in the past, have involved FFmpeg as the biggest challenge, because students come from such a wide variety of backgrounds, and some of them have never used the command line before (or know what it is). So, for something that can be difficult to install and also use something they’ve never experienced before, it can get tricky.
For this class, I experimented with seeing if I could get the class requirements fulfilled through using FFmpeg… in the browser!
But first, we went the traditional way, via the CLI.
Goal 1: Using FFmpeg, transcode an access video copy of the video master
Use this script:
ffmpeg -i archival-file.mov -c:v libx264 -pix_fmt yuv420p -c:a aac -map 0:v:0 -map 0:a:1 access-file.mp4
Modified from ffmprovisr: Transcode to h264.
Goal 2: Using FFmpeg, transcode an access audio file from the video master’s audio track
Use this script: ffmpeg -i archival-file.mov -c:a copy -vn -map 0:a:0 audio-file.mp3
Modified from ffmprovisr: Extract audio.
As part of the class, we walked through what all of these flags do and why I was using them to achieve our goals.
Okay, as I alluded to earlier! Some students weren’t able to download FFmpeg or need more context that I would be able to give in an in-person and longer class, so I was hoping to be able to circumvent that with using the ffmpeg.wasm playground. This is such a feat! And I was really nerding out while demo’ing this because I wasn’t sure if it was going to work for them or not, or if we would have to fall back on a more simple example using the playground (and students, working in groups, would have to rely on other teammates that could get FFmpeg sorted out).
For that, we just had to modify the bits of the script into an array that the web platform wanted (note: it can be a bit finicky, but that’s fine, they got to see some realistic live testing and debugging from me).
Here’s what I said: For FFmpeg browser users, copy and paste these into the Editor (note you will also have to upload a file named archival-file.mov in the “File System” tab):
For the access file:
[
  "-i","archival-file.mov",
  "-c:v","libx264",
  "-pix_fmt","yuv420p",
  "-c:a","aac",
  "-map", "0:v:0",
  "-map", "0:a:1",
  " access-file.mp4"
]
For the audio file:
["-i", "archival-file.mov",
"-c:a", "copy",
"-vn",
"-map", "0:a:0",
"audio-file.mp3"]
This worked! The transcoding did take several minutes, which is totally expected.
This is such a breakthrough for just teaching FFmpeg!!! At least, we’ll see how folks feel when the class is wrapped up, but I think it’ll be easy to keep iterating on this and improvising and sorting it out. Also, I’d love to find some time to try hosting the ffmpeg.wasm library myself and customize it exactly to fit educational sandbox requirements.
Now that we have our faux preservation copy and an access copy and an extracted audio copy, I show them how to use MediaInfo to grab technical metadata from all the files. As a bonus, we are able to directly extract data structured as PBCore so it can fit right into
On the command line:
mediainfo archival-file.mov --Output=PBCore2 > archival-file.xmlmediainfo access-file.mov --Output=PBCore2 > access-file.xmlmediainfo audio-file.mov --Output=PBCore2 > audio-file.xml
In a prior class, I stepped through how to use mediainfo and what it looks like in the GUI. But MediaInfo is ALSO available online, in the browser, at MediaInfoOnline! And MediaInfo is such a tidy lil microservice, the results are pretty much instant.
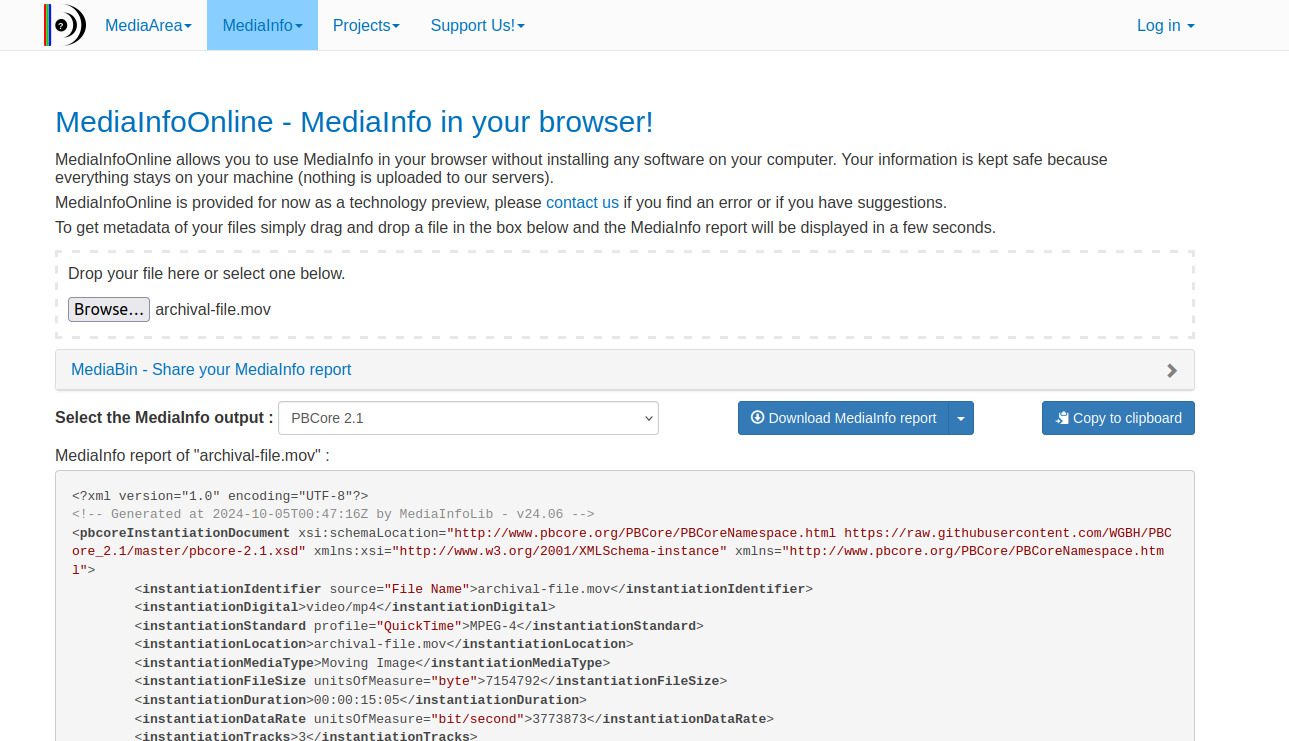
So students that aren’t comfortable with the command line or have limited ability to download things onto their computer don’t have to be limited in this part of the project, either, and they can still get the important part: extracted technical metadata already aligned with a specific archival standard to store alongside files or to further ingest into a preservation or access system, if needed.
The rest of this project involves talking about file relationships and naming conventions, and getting into the usual information sciences stuff, which lend well to discussion but not so much for this blog post. That wraps up this blog post, which may be a bit loosy-goosy because I was also watching the latest season of Love is Blind while watching it, but if you managed to read this entire bit, I hope it was helpful for you!